Introduction to React.js
Table of Contents
- What is React.js?
- Getting Started, Two Methods
- React Components
- Sample App
- Start the App
- Build the App
What is React.js?
Reactjs is a javascript library that allows to create interactive web applications. It is the type of applications that look like "desktop" applications that don't require the browser web pages to be reloaded when displaying new content.
Getting Started, Two Methods
There are two methods you can use to get started with React.js.
You can either use a command called create-react-app OR you can
use CDN links.
- Using create-react-app
The create-react-app command is a script that will download the needed packages to build and run a React.js application locally. This command requires that you have installed Node.js.
To run the command you would have to type the following sentence on a terminal window:
npx create-react-app <app-name>
So, let's say we are going to build a sample Notes app. We will run the following sentence:
npx create-react-app notes
That will create a folder structure like the following:
notes/
   ├─ node_modules/
   ├─ package-lock.json
   ├─ package.json
   ├─ public/
   ├─ README.md
   └─ src
      ├─ App.css
      ├─ App.js
      ├─ App.test.js
      ├─ index.css
      ├─ index.js
      ├─ logo.svg
      ├─ reportWebVitals.js
      └─ setupTests.js
We will be writing our code mostly on the src/App.js file. We can also create additional files, which will be imported into the App.js file.
- Using CDN Links
The CDN links can be found on the https://reactjs.org/docs/cdn-links.html url.
On an html page we include the links to the react and react-dom javascript libraries. Also, we need to include the link to the babel library.
The following is an example html page using the development version of the react libraries.
<!DOCTYPE html>
<html>
    <head>
        <script src="https://unpkg.com/@babel/standalone/babel.js"></script>
        <script src="https://unpkg.com/react/umd/react.development.js"></script>
        <script src="https://unpkg.com/react-dom/umd/react-dom.development.js"></script>
    </head>
    <body>
        <div id="root"></div>
        <script type="text/babel">

            <-- Your React.js code goes here -->

        </script>
    </body>
</html>
We can find the production version of the react libraries at the following urls:
<script src="https://unpkg.com/react/umd/react.production.min.js"></script>
<script src="https://unpkg.com/react-dom/umd/react-dom.production.min.js"></script>
We also can use a specific version of the libraries:
<script src="https://unpkg.com/react@17.0.1/umd/react.development.js"></script>
<script src="https://unpkg.com/react-dom@17.0.1/umd/react-dom.development.js"></script>
<script src="https://unpkg.com/react@17.0.1/umd/react.production.min.js"></script>
<script src="https://unpkg.com/react-dom@17.0.1/umd/react-dom.production.min.js"></script>
To test the html page we need a web server, which can be local (using MAMP, Docker, or a similar program), or a remote web server.
React Components
The central concept on React.js is that the user interfaces are created with what is called Components.
The output of the components is just standard html code.
There are two ways to create components, either with a javascript function, or a javascript class.
Here you can see examples of each one of them:
Function Component
function Sample() {
    return (
        <div>Sample</div>
    );
}
Class Component
import React from 'react';

class Sample extends React.Component {
   render() {
     return (
       <div>Sample</div>
     );
   }
}
Sample App
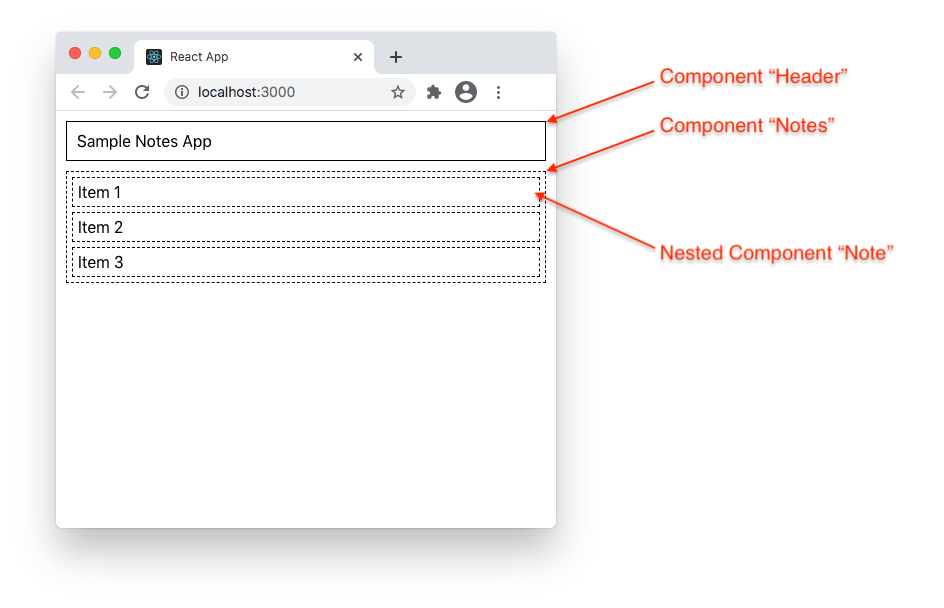
Now, let's build a sample application with three components.
On this application, we are going to have a top component named "Header". And below it, we will have a "Notes" components which will have nested "Note" components, as shown on this image:
We build this application with the create-react-app command.
So, first locate the src/App.js file on the folder structure created by that command, and replace its content
with the following source code:
src/App.js
import './App.css';

const notes = [
    {id: 1, title: 'Item 1' },
    {id: 2, title: 'Item 2' },
    {id: 3, title: 'Item 3' }
];

function Header() {
    return (
        <div className="header">Sample Notes App</div>
    )
}

function Notes(props) {
    const notes = props.notes;
    return (
        <div className="container">
            {notes.map((note) =>
                <Note key={note.id} value={note.title} />
            )}
        </div>
    );
}

function Note(props) {
    return (
        <div className="item">{props.value}</div>
    )
}

function App() {
    return (
        <>
            <Header />
            <Notes notes={notes} />
        </>
    );
}

export default App;
- There are three function components, for the Header, Notes, and Note components.
- The Note is nested inside the Notes component, which means that it is invoked by the Notes component.
- The Notes and Note functions have a props parameter. This is used to pass data to the components.
Here we used it to pass the text displayed on the Note component.
Additionally, we replace the content of the src/App.css with the following source code:
src/App.css
.header {
    margin: 10px;
    padding: 10px;
    border: 1px solid black;
}

.container {
    margin: 10px;
    border: 1px dashed black;
}

.item {
    margin: 5px;
    padding: 5px;
    border: 1px dashed black;
}
Start the App
During development, to start the App you will execute the npm start command on a terminal window on the "project" folder. On our sample the project folder would be the "notes" folder.
npm start
You will see an output similar to this one:
> notes@0.1.0 start /PATH-TO-YOUR-PROJECT-FOLDER/notes
> react-scripts start

Starting the development server...

Compiled successfully!

You can now view notes in the browser.

  Local:            http://localhost:3000
  On Your Network:  http://192.168.254.16:3000

Note that the development build is not optimized.
To create a production build, use npm run build.
And, your default browser will automatically open the http://localhost:3000/ url showing the application.
To stop the development server, press the CTRL-C keys.
Build the App
Once you have finished the development of your app, and it is ready to be published, you will run the following command:
npm run build
You will see an output similar to this one:
> notes@0.1.0 build /PATH-TO-YOUR-PROJECT-FOLDER/notes
> react-scripts build

Creating an optimized production build...
Compiled successfully.

File sizes after gzip:

  41.2 KB  build/static/js/2.569b719b.chunk.js
  773 B    build/static/js/runtime-main.738bd9b9.js
  454 B    build/static/js/main.1c13a0d9.chunk.js
  341 B    build/static/css/main.c1f71dbc.chunk.css

The project was built assuming it is hosted at /.
You can control this with the homepage field in your package.json.

The build folder is ready to be deployed.
You may serve it with a static server:

  npm install -g serve
  serve -s build

Find out more about deployment here:

  https://cra.link/deployment
Then, you will find that a new folder, named "build", has been created:
notes/
   ├─ build/
   ...
The "build" folder contains the "compiled" version of the app, that can now be uploaded to a remote server.
Live Demo
See this app on StackBlitz here.